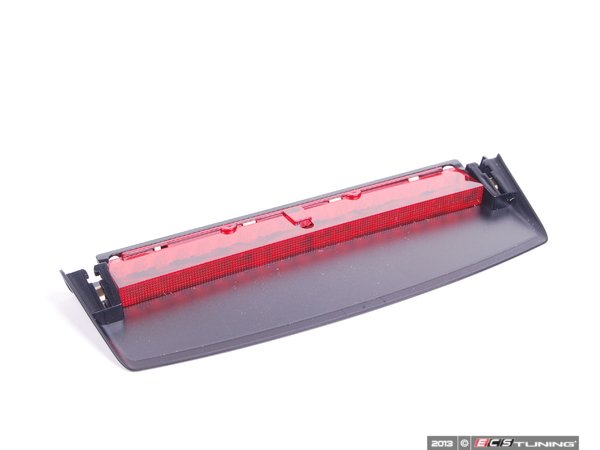
How to Replace Audi A5 Third Brake Light 2010
-
06-01-201604:06 PM #1

Registered Member One Ring
Centre Brake Light warning
Hey guys. I've done some research and I'd like to get a more clear cut answer to my findings.
Occasionally when im driving, or starting up my car, when I press on the brake pedal the centre light warning goes on. Sometimes it wont show up at all. The 3rd brake light doesnt light up and the warning is there. It never goes away while driving, but it does pop up occasionally but not every time that i drive it.
It looks like people have fixed it by replacing the rear centre brake light. However, when i went to audi, they suggested that it may be a brake light switch.
What could be the problem and what would be the fix? Just want to know what to buy before I go in and purchase the proper part.
-
06-01-201608:39 PM #2
Established Member Two Rings

 Originally Posted by Hydro4acid
Hey guys. I've done some research and I'd like to get a more clear cut answer to my findings.
Occasionally when im driving, or starting up my car, when I press on the brake pedal the centre light warning goes on. Sometimes it wont show up at all. The 3rd brake light doesnt light up and the warning is there. It never goes away while driving, but it does pop up occasionally but not every time that i drive it.
It looks like people have fixed it by replacing the rear centre brake light. However, when i went to audi, they suggested that it may be a brake light switch.
What could be the problem and what would be the fix? Just want to know what to buy before I go in and purchase the proper part.
Hey I was having the same issue as you are describing. Would come on randomly, noticed it more in hotter weather. I opted to buying a used 3rd brake light from a forum member and I have not had the issue return since.
2010 Audi S4 Prestige 6MT Sprint Blue
-
06-01-201609:25 PM #3
Registered Member One Ring
Thanks! Im hoping to get another similar reply to seal my purchase on the third light as recommended.
-
08-08-201604:08 PM #4
Established Member Two Rings

This just started happening to me today. Did a new brake light solve the issue? Thanks.
Current;
2020 GMC SierraPrevious;
2011 B8 S4
1968 Camaro SS
2006 Mazda6 5MT
1994 Buick Skylark
2002 Mercury Cougar 5MT
1985 Audi 5000S Turbo
-
08-08-201604:42 PM #5
Veteran Member Four Rings

For those with issues with the 3rd brake light, here's a very good DIY for how to remove the assembly.
Before purchasing a new (or used) 3rd brake light, you might want to consider whether the electrical connector on the part is making good contact. Pulling the assembly out using the DIY above is the first step. I would recommend removing any watches or rings that could scratch the rear window, or the defrost elements on the glass, before pulling out the unit. Assuming the connector is tightly seated and the light is still not working, then check for voltage at the connector's pins with a voltmeter while someone steps on the brake pedal.
Not sure if there's a fuse for the 3rd brake light in the trunk's side panels (or in either of the fuse panels at the driver's or passenger's end of the dash panel) that protects the 3rd brake light - perhaps someone here has a schematic and can verify.
Let us know what you find out. Oh, and while you've got the 3rd brake light unit removed, be sure to clean the window glass that you can't get to with the assembly installed!
Found a list of the 3 fuse panel locations for a B8 Audi A4. Don't specifically see the brake lights listed, but adding the link here anyway.
Last edited by LYKUNO; 08-08-2016 at 06:46 PM. Reason: Add fuse assignment list link
2011 S4 | Prestige | Jet Blue | Black/Silver Silk Nappa | S-Tronic | Sport Diff | Drive Select | Side Assist | Titanium | Carbon Fiber Inlays | HRE R40s (summer) BBS RGRs (winter)
-
08-09-201601:08 PM #6
Established Member Two Rings
Originally Posted by LYKUNO For those with issues with the 3rd brake light, here's a very good DIY for how to remove the assembly.
Before purchasing a new (or used) 3rd brake light, you might want to consider whether the electrical connector on the part is making good contact. Pulling the assembly out using the DIY above is the first step. I would recommend removing any watches or rings that could scratch the rear window, or the defrost elements on the glass, before pulling out the unit. Assuming the connector is tightly seated and the light is still not working, then check for voltage at the connector's pins with a voltmeter while someone steps on the brake pedal.
Not sure if there's a fuse for the 3rd brake light in the trunk's side panels (or in either of the fuse panels at the driver's or passenger's end of the dash panel) that protects the 3rd brake light - perhaps someone here has a schematic and can verify.
Let us know what you find out. Oh, and while you've got the 3rd brake light unit removed, be sure to clean the window glass that you can't get to with the assembly installed!
Found a list of the 3 fuse panel locations for a B8 Audi A4. Don't specifically see the brake lights listed, but adding the link here anyway.
Look at you overachiever!! Thank you!!! I will be tackling this in the next few days and will let you know how it goes. Thanks again!!!!
Current;
2020 GMC SierraPrevious;
2011 B8 S4
1968 Camaro SS
2006 Mazda6 5MT
1994 Buick Skylark
2002 Mercury Cougar 5MT
1985 Audi 5000S Turbo
-
08-09-201602:58 PM #7
Veteran Member Four Rings
I've found loose solder points on a few lights that I've replaced. Don't recall what a new light runs, but it's worth a look
Keep right pass left, it's the law!!
-
08-09-201603:16 PM #8
Account Terminated Three Rings
Had intermittent error messages like that. 3rd brake light wouldn't work when that happened. Replaced it and all was fine after that. It's pretty simple, pull/slide the old one out, unhook the connector and reverse the order for the new one. If you must, get one of those plastic pry tools that come in kits to get better leverage between headliner and back of light under it. Just be careful not to crease or otherwise damager headliner edge.
-
08-09-201603:24 PM #9
Senior Member Three Rings
am having the same problem and i notice it come on in hot weather and when i hit a ditch hard. where dose everyone buy there new brake light i see eBay and rock auto have them for 45 or less. did you just go to audi and buy oem?
AWE Quad Exhaust / Rotifom Ind 19x10 (old) / V12 245/35 tires / Solo Werks / ECS Carbon Luft Intake / Stoptech / Verde V99 19x9.5
Enlaes CF decklid / EPL 1+ w DSG
https://www.instagram.com/admirstl3/
-
08-09-201605:46 PM #10
Veteran Member Four Rings
Originally Posted by AudiSTL am having the same problem and i notice it come on in hot weather and when i hit a ditch hard. where dose everyone buy there new brake light i see eBay and rock auto have them for 45 or less. did you just go to audi and buy oem?
ECS Tuning has them (link to the 3rd brake light part here). $78 for part 8K5945097.
2011 S4 | Prestige | Jet Blue | Black/Silver Silk Nappa | S-Tronic | Sport Diff | Drive Select | Side Assist | Titanium | Carbon Fiber Inlays | HRE R40s (summer) BBS RGRs (winter)
-
09-12-201606:14 PM #11
Established Member Two Rings
Originally Posted by LYKUNO For those with issues with the 3rd brake light, here's a very good DIY for how to remove the assembly.
Before purchasing a new (or used) 3rd brake light, you might want to consider whether the electrical connector on the part is making good contact. Pulling the assembly out using the DIY above is the first step. I would recommend removing any watches or rings that could scratch the rear window, or the defrost elements on the glass, before pulling out the unit. Assuming the connector is tightly seated and the light is still not working, then check for voltage at the connector's pins with a voltmeter while someone steps on the brake pedal.
Not sure if there's a fuse for the 3rd brake light in the trunk's side panels (or in either of the fuse panels at the driver's or passenger's end of the dash panel) that protects the 3rd brake light - perhaps someone here has a schematic and can verify.
Let us know what you find out. Oh, and while you've got the 3rd brake light unit removed, be sure to clean the window glass that you can't get to with the assembly installed!
Found a list of the 3 fuse panel locations for a B8 Audi A4. Don't specifically see the brake lights listed, but adding the link here anyway.
So after my first post, I ordered a $10 trim tool kit from Amazon. Once arrived, I pulled the old tail light out. I had my daughter press the brake pedal while I ran a voltmeter on the connection, and found it was drawing power. So I purchased the $75 replacement light from ECS. Finally arrived today, plugged it in and it worked just fine. Took me about 2 mins to get it back in with the trim tool to get it under the headliner and it snapped into place.
Kind of disappointing that the first one burnt out, but so be it. I have the old one and am considering trying to pull it apart to see if some solders broke or what the issue might have been, but separating the led strip from the housing seems almost impossible.
Thanks for all the help and the DIY thread!!
Current;
2020 GMC SierraPrevious;
2011 B8 S4
1968 Camaro SS
2006 Mazda6 5MT
1994 Buick Skylark
2002 Mercury Cougar 5MT
1985 Audi 5000S Turbo
-
04-18-201903:41 PM #12
Established Member Two Rings

Put the light back on
Originally Posted by S4Drew So after my first post, I ordered a $10 trim tool kit from Amazon. Once arrived, I pulled the old tail light out. I had my daughter press the brake pedal while I ran a voltmeter on the connection, and found it was drawing power. So I purchased the $75 replacement light from ECS. Finally arrived today, plugged it in and it worked just fine. Took me about 2 mins to get it back in with the trim tool to get it under the headliner and it snapped into place.
Kind of disappointing that the first one burnt out, but so be it. I have the old one and am considering trying to pull it apart to see if some solders broke or what the issue might have been, but separating the led strip from the housing seems almost impossible.
Thanks for all the help and the DIY thread!!
Everyone seems to have no problem putting the light back on but I�m having a hell of a time at it! I tried for like ten minutes but the headliner goes so low that it prevents the assembly from being able to clip back in. So I was pulling down on the headliner and pushing one side at a time. Finally I got one side to slide in like this, but when I went over to the other side and did the same thing I put too much force on it and the plastic clips on the assembly that go around the metal guides broke and it won�t sit flush on that side. I guess it�s better than nothing but pretty disappointing. I really don�t understand how anyone else reconnected their lights with so much ease. Is my headliner somehow tighter than everyone else�s around the center break housing?
-
04-18-201909:58 PM #13
Veteran Member Four Rings
Sorry to hear you had trouble getting the light assembly back in place. As I recall, when I had removed the light assembly to clean the glass, sliding it back into place was a little difficult. As you can see in the pictures above, there are electrical connectors (ribbon-like metal) inside the plastic guides on each end of the light. What I did to make it easier to slip/slide the assembly back into place was to put a small amount of a dielectric grease (similar lubricants should work as well) into the edges of the 2 (female) connector guides where they make contact with the 2 (male) connectors at the edge of the headliner. I also put a small amount of lubricant on these male connectors. It doesn't require a lot of lubricant to make the parts slip together more easily. I just applied it with the end of a Q-tip. Wish I had added that installation tip in my earlier post, as it might have helped with your installation.
2011 S4 | Prestige | Jet Blue | Black/Silver Silk Nappa | S-Tronic | Sport Diff | Drive Select | Side Assist | Titanium | Carbon Fiber Inlays | HRE R40s (summer) BBS RGRs (winter)
-
05-21-201907:32 PM #14
Senior Member Two Rings
-
07-14-202012:18 PM #15
Established Member Two Rings
If you don�t wanna deal with it. Can you just vagcom so it won�t throw the �center brake light error�? And don�t use it at all? Just curious
-
08-13-202010:08 AM #16
New Member One Ring
i nearly bought a new centre brake light but as it was hard to procure i had a go at the switch in the meantime and after a few tugs and wiggles seems to have fixed its errant ways .all is well
-
08-13-202010:10 AM #17
New Member One Ring
Originally Posted by NguyenerA4 If you don�t wanna deal with it. Can you just vagcom so it won�t throw the �center brake light error�? And don�t use it at all? Just curious
i stuck a piece of yellow sticky note over it so i cant see it and that worked ok
-
08-13-202010:13 AM #18
Senior Member Two Rings
Originally Posted by bryst i nearly bought a new centre brake light but as it was hard to procure i had a go at the switch in the meantime and after a few tugs and wiggles seems to have fixed its errant ways .all is well
That would be a very temporary solution. I�d say get a $10 soldering gun and fix it for good.
Sent from my iPhone using Tapatalk
-
08-14-202007:38 AM #19
New Member One Ring
Originally Posted by maksym That would be a very temporary solution. I�d say get a $10 soldering gun and fix it for good.
Sent from my iPhone using Tapatalk
yes its gone bad again so ordered a new light unit from audi spares at 52 UK pounds to change ir over
-
08-15-202004:59 AM #20
New Member One Ring
i ordered a new lens and fited it today and the lights working ok so it was the LEDS faulty and not the switch .10, minute job to change it over
-
04-04-202110:18 PM #21
Active Member One Ring
Hello, its been long time hope you remember this job.
Im facing same problem. In my 2013 audi a4 3rd brake light is not working. I saw that to local mechanic he said one of led doesn't work. So i bought 2 different lights . 1)dorman 3rd brake light online and also bought OEM light from scrap audi a4 2011. However, both of them are not working after plugged in.
So my question is how did you check circuit with voltmeter. Can you please elaborate the method to confirm circuit is working. So I can buy New OEM light.
-
04-04-202110:20 PM #22
Active Member One Ring
Originally Posted by S4Drew So after my first post, I ordered a $10 trim tool kit from Amazon. Once arrived, I pulled the old tail light out. I had my daughter press the brake pedal while I ran a voltmeter on the connection, and found it was drawing power. So I purchased the $75 replacement light from ECS. Finally arrived today, plugged it in and it worked just fine. Took me about 2 mins to get it back in with the trim tool to get it under the headliner and it snapped into place.
Kind of disappointing that the first one burnt out, but so be it. I have the old one and am considering trying to pull it apart to see if some solders broke or what the issue might have been, but separating the led strip from the housing seems almost impossible.
Thanks for all the help and the DIY thread!!
Hello, its been long time hope you remember this job.
Im facing same problem. In my 2013 audi a4 3rd brake light is not working. I saw that to local mechanic he said one of led doesn't work. So i bought 2 different lights . 1)dorman 3rd brake light online and also bought OEM light from scrap audi a4 2011. However, both of them are not working after plugged in.
So my question is how did you check circuit with voltmeter. Can you please elaborate the method to confirm circuit is working. So I can buy New OEM light
-
04-05-202106:38 AM #23
Veteran Member Four Rings
AJ - One you remove the light assembly, you should be able to see the wiring connectors, where (with assistance from a helper who holds down the brake pedal) you should be able to measure voltage at the wired connector. It should be evident once the assembly has been removed and the wiring connectors are visible as per this pic:
2011 S4 | Prestige | Jet Blue | Black/Silver Silk Nappa | S-Tronic | Sport Diff | Drive Select | Side Assist | Titanium | Carbon Fiber Inlays | HRE R40s (summer) BBS RGRs (winter)
-
04-05-202107:00 AM #24
Active Member One Ring
Originally Posted by LYKUNO AJ - One you remove the light assembly, you should be able to see the wiring connectors, where (with assistance from a helper who holds down the brake pedal) you should be able to measure voltage at the wired connector. It should be evident once the assembly has been removed and the wiring connectors are visible as per this pic:
Great. I already removed the assembly and was trying with out holding brake pendal. I will try again by your method.
One more thing by any chance do you who which wire is positive terminal and which side is ground? There is one thick cable(light pink) and one is thin(black with red strips). And what should be voltage settings in multimeter?
Thank you.
-
04-05-202111:18 PM #25
Veteran Member Four Rings
Originally Posted by AJpatel Great. I already removed the assembly and was trying with out holding brake pendal. I will try again by your method.
One more thing by any chance do you who which wire is positive terminal and which side is ground? There is one thick cable(light pink) and one is thin(black with red strips). And what should be voltage settings in multimeter?
Thank you.
Wish I had a schematic to identify polarity of the wires in the connector, but I don't. If you have access to a digital voltmeter or even something as simple as a test light, you should be able to ascertain which lead is providing power (which I assume will be 12VDC) when the brake pedal is depressed. Then the other wire would ordinarily be the ground connection. Hope that is helpful. Let us know how it works out for you.
2011 S4 | Prestige | Jet Blue | Black/Silver Silk Nappa | S-Tronic | Sport Diff | Drive Select | Side Assist | Titanium | Carbon Fiber Inlays | HRE R40s (summer) BBS RGRs (winter)
-
04-06-202105:03 AM #26
Veteran Member Four Rings
Ground in these cars is typically a brown wire.
Sent from my SM-G988U using Audizine Forum mobile app
Custom DP 194/57 E40 Water-Meth (Aquamist) | BG HPT ZF8 Tune | APR CPS with AWE Reservoir (Divorced Coolant Loop) | APR Open Intake and 034 Intake Tube | RSE Heat Shielded HFCs | CTS Downpipes with Vibrant UQ Resonators Added | AWE Touring Exhaust | 034 RSB | Bilstein B8 Shocks and H&R -3 Springs | ECS Trans and Drivetrain Inserts | 034 Trans and Motor Mounts | Moog Front End Links | Headlight Projector Retrofit and Painted Housings
-
04-06-202106:58 AM #27
Active Member One Ring
Originally Posted by LYKUNO Wish I had a schematic to identify polarity of the wires in the connector, but I don't. If you have access to a digital voltmeter or even something as simple as a test light, you should be able to ascertain which lead is providing power (which I assume will be 12VDC) when the brake pedal is depressed. Then the other wire would ordinarily be the ground connection. Hope that is helpful. Let us know how it works out for you.
Thank you. This will surely help. I will try over this weekend and let you know what its shows.
-
04-06-202107:15 AM #28
Veteran Member Four Rings
Originally Posted by AJpatel Thank you. This will surely help. I will try over this weekend and let you know what its shows.
As I mentioned above, the brown wire is your ground, the other is your +12V. It is very typical of Audi/VW to use brown for their grounds. If you look in general, brown wires are everywhere and is obvious when you look at the various grounds throughout the car.
Sent from my SM-G988U using Audizine Forum mobile app
Custom DP 194/57 E40 Water-Meth (Aquamist) | BG HPT ZF8 Tune | APR CPS with AWE Reservoir (Divorced Coolant Loop) | APR Open Intake and 034 Intake Tube | RSE Heat Shielded HFCs | CTS Downpipes with Vibrant UQ Resonators Added | AWE Touring Exhaust | 034 RSB | Bilstein B8 Shocks and H&R -3 Springs | ECS Trans and Drivetrain Inserts | 034 Trans and Motor Mounts | Moog Front End Links | Headlight Projector Retrofit and Painted Housings
-
04-06-202108:00 AM #29
Established Member Three Rings
-
04-06-202101:57 PM #30
Veteran Member Four Rings
Originally Posted by Corydms7 �Centre� lol
It's the sophisticated spelling.

Sent from my SM-G988U using Audizine Forum mobile app
Custom DP 194/57 E40 Water-Meth (Aquamist) | BG HPT ZF8 Tune | APR CPS with AWE Reservoir (Divorced Coolant Loop) | APR Open Intake and 034 Intake Tube | RSE Heat Shielded HFCs | CTS Downpipes with Vibrant UQ Resonators Added | AWE Touring Exhaust | 034 RSB | Bilstein B8 Shocks and H&R -3 Springs | ECS Trans and Drivetrain Inserts | 034 Trans and Motor Mounts | Moog Front End Links | Headlight Projector Retrofit and Painted Housings
-
04-11-202103:53 PM #31
Established Member Three Rings

What's the best product replacement for these? eBay? Mine is broken.
https://www.ebay.com/itm/For-Audi-A4...9/393159593085
Last edited by mahhdd; 04-11-2021 at 04:11 PM.
2015 Sepang Blue ▰ S4, 6MT, Sport Diff
ECS Resonated Valved Exhaust, CTS Turbo Intake, MercRacing S6 HX, CWA 100-3 Coolant Pump, 034 Stage 1 Tune
034 Rear Sway Bar, 034 Drivetrain Mounts/Inserts, Moog End Links, JXB Shifter & Mount
Viofo A129 Pro, VCDS, 25% Tint, ECS Boost Tap, SportsShifters GT2-CF Knob, RS4 Grille
Future: CAP Test Pipes, JHM Catted+Baffled DPs, JXB Linkage Upgrade, P3, ECA, HPFP
-
06-25-202104:02 PM #32
Active Member One Ring
Just an update for future reference.
I tried to diagnose problem with voltmeter by my self but I couldn't find. I also show it to local mechanics but they also couldn't do that.
So Finally I went to Audi to get this done. They change 400$ to just diagnose the problem and 10$ for connector. So basically problem was in connector. However they also used my aftermarket break light instead of old one.
-
06-25-202109:52 PM #33
Veteran Member Four Rings
Originally Posted by AJpatel Just an update for future reference.
I tried to diagnose problem with voltmeter by my self but I couldn't find. I also show it to local mechanics but they also couldn't do that.
So Finally I went to Audi to get this done. They change 400$ to just diagnose the problem and 10$ for connector. So basically problem was in connector. However they also used my aftermarket break light instead of old one.
Wow, I hope that diagnostic charge was a typo! No way should a dealer charge $400 to diagnose a bad 3rd brake light connector. If they were charging $100/hour, that's be 4 hours of labor, or $200/hour, 2 hours of labor. They likely found and fixed it in 30 minutes (1 hour at the max). Does your bill reflect the hourly rate for the service? Did the dealer's service manager quote you an estimate of what the repair work could cost before they started working on your car? If the Audi dealer really charged you that much, I would escalate it up to the dealership's management chain and get some reasonable portion of that charge refunded back to you. If the dealership refuses to honor your request, take it up to Audi corporate.
Glad they got it fixed but sorry to hear they overcharged you for the work (unless they performed other service work in addition to the brake light connector replacement. I would recommend using an independent repair shop for this type of work, should you need simple repairs in the future.
2011 S4 | Prestige | Jet Blue | Black/Silver Silk Nappa | S-Tronic | Sport Diff | Drive Select | Side Assist | Titanium | Carbon Fiber Inlays | HRE R40s (summer) BBS RGRs (winter)
-
06-26-202103:31 PM #34
Established Member Three Rings
Originally Posted by AJpatel Just an update for future reference.
I tried to diagnose problem with voltmeter by my self but I couldn't find. I also show it to local mechanics but they also couldn't do that.
So Finally I went to Audi to get this done. They change 400$ to just diagnose the problem and 10$ for connector. So basically problem was in connector. However they also used my aftermarket break light instead of old one.
$400? MUST be a typo. PLEASE.
2015 Sepang Blue ▰ S4, 6MT, Sport Diff
ECS Resonated Valved Exhaust, CTS Turbo Intake, MercRacing S6 HX, CWA 100-3 Coolant Pump, 034 Stage 1 Tune
034 Rear Sway Bar, 034 Drivetrain Mounts/Inserts, Moog End Links, JXB Shifter & Mount
Viofo A129 Pro, VCDS, 25% Tint, ECS Boost Tap, SportsShifters GT2-CF Knob, RS4 Grille
Future: CAP Test Pipes, JHM Catted+Baffled DPs, JXB Linkage Upgrade, P3, ECA, HPFP
-
07-02-202109:17 PM #35
Active Member One Ring
I wish it was typo. However the charges was 400$ CAD not USD. I tried to show it to some local mechanic but they also couldn't do and i didn't want to risk computer system. So i went to audi.
In the bill it didn't reflect hourly rate. They just mentioned diagnose charges. And yes they mentioned me the quote after spending half an hour on my car and said they need to check whole wiring system and car was done in 4 hours. And they also change some wiring connectors.
- - - Updated - - -
Sorry to say but it wasn't typo. 400$ CAD plus tax.
-
07-02-202109:18 PM #36
Established Member Three Rings
Originally Posted by AJpatel I wish it was typo. However the charges was 400$ CAD not USD. I tried to show it to some local mechanic but they also couldn't do and i didn't want to risk computer system. So i went to audi.
In the bill it didn't reflect hourly rate. They just mentioned diagnose charges. And yes they mentioned me the quote after spending half an hour on my car and said they need to check whole wiring system and car was done in 4 hours. And they also change some wiring connectors.
- - - Updated - - -
Sorry to say but it wasn't typo. 400$ CAD plus tax.
That's absolute bullshit they did that to you.
2015 Sepang Blue ▰ S4, 6MT, Sport Diff
ECS Resonated Valved Exhaust, CTS Turbo Intake, MercRacing S6 HX, CWA 100-3 Coolant Pump, 034 Stage 1 Tune
034 Rear Sway Bar, 034 Drivetrain Mounts/Inserts, Moog End Links, JXB Shifter & Mount
Viofo A129 Pro, VCDS, 25% Tint, ECS Boost Tap, SportsShifters GT2-CF Knob, RS4 Grille
Future: CAP Test Pipes, JHM Catted+Baffled DPs, JXB Linkage Upgrade, P3, ECA, HPFP


How to Replace Audi A5 Third Brake Light 2010
Source: https://www.audizine.com/forum/showthread.php/709887-Centre-Brake-Light-warning
0 Response to "How to Replace Audi A5 Third Brake Light 2010"
Post a Comment